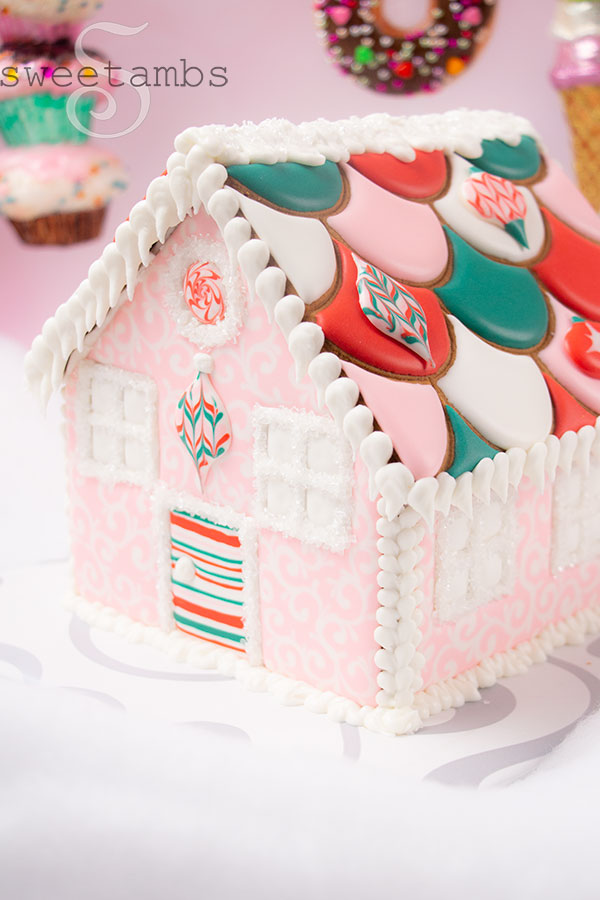
Pink Gingerbread House Tutorial
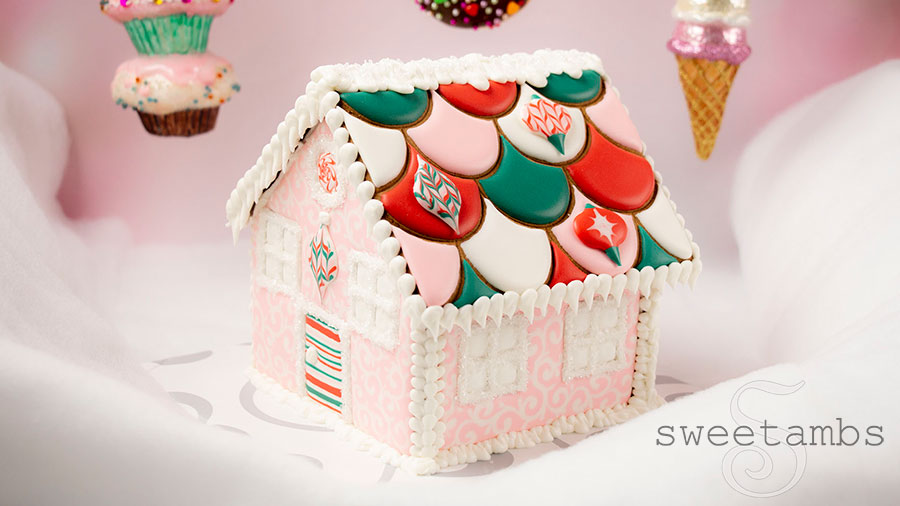

One of the things I love most about this gingerbread house kit is that it has scallops imprinted on the roof pieces, making it easy to create this design.
Get access to exclusive cookie decorating tutorials, my cookie and royal icing recipes, and individualized cookie decorating advice by joining my Cookie Art Club!
This post contains affiliate links. Read my affiliate disclosure here.

Here’s what you’ll need to make this gingerbread house
- Cake board
- Pre-baked Gingerbread House Base
- Royal Icing
- Blue gel color
- Yellow gel color
- Red gel color
- Black gel color
- White sanding sugar
- White nonpareils
- Gold stars
- Piping bags
- Metal scribe tool


You will also need
- Stand or Hand Mixer to mix icing
- Mixing Bowls
- Parchment or wax paper
- Jars or cans to help prop the house as it dries


Instructions
- Make the royal icing according to the recipe instructions. The icing should hold a stiff peak.
- Separate 1 cup of stiff icing and set it aside.
- Thin the rest of the icing to flood consistency. Test the consistency by taking a spoonful out and dropping it back in. It should take 15-20 seconds to be completely smooth.
- Place ¼ cup of flood consistency icing into a small container, ¼ cup of flood consistency icing into another container, and split the remaining flood consistency icing into two separate containers (this will be about ½ cup each).
- Color ¼ cup of icing with red food coloring (I used 10 drops).
- Color ¼ cup of icing with a drop of yellow food coloring and add blue, a small drop at a time, until it looks teal.
- Color ½ cup of icing with a tiny bit of red food coloring to make pink. Leave the remaining flood consistency icing white.
- Fill tipless decorating bags with the flood consistency icing. Tie the top of the bags to keep the icing from spilling out as you are decorating the gingerbread house.
- Ice the windows on the front and side panels with white flood consistency icing.
- Ice the top window with white and pipe lines of red and pink icing. Use the scribe tool to swirl the colors together, starting on the outside and working toward the middle to create a spiral.
- Ice the door with white flood consistency icing avoiding the doorknob. Pipe horizontal strips of different colors and different thicknesses. Set the front and side panels aside.
- Ice the scallops on the roof, alternating between each color of icing. Use the scribe tool to help shape the icing. Set the roof pieces aside.
- Ice the house panels with pink flood consistency icing, working on one section at a time. Pipe a filigree design with white flood consistency icing.
- Wrap a baking sheet or any flat surface with wax paper or parchment paper. Pipe small ornaments with the flood consistency icing. You can drag the scribe tool through the icing to create different designs. Allow all of the house pieces and ornaments to dry overnight.
- Fill a tipless decorating bag with the white stiff consistency icing.
- Pour the sparkling sugar into a dish. Outline the windows with the white stiff consistency icing. Dip the icing into the sparkling sugar. Repeat the process around the doors.
- Attach the ornaments with the stiff icing.
- Assemble the house according to the assembly instructions.
- Cover the seams with a bead border and pipe icicles on the edge of the roof using the white stiff consistency icing.


Subscribe
Login
0 Comments
Subscribe
0 Comments