Valentine’s Day Decorated Sugar Cookies | Wet on Wet Royal Icing Roses


The inspiration for these Valentine’s Day decorated sugar cookies came from a rooster xylophone that my daughters got for Christmas! It was the perfect color palette for these cookies that I decorated with wet-on-wet royal icing roses.
Watch the video and get the supply list below!
Get access to exclusive cookie decorating tutorials, my cookie and royal icing recipes, and individualized cookie decorating advice by joining my Cookie Art Club!

Wet On Wet Royal Icing Sugar Cookie Decorating Technique
There are a few things to keep in mind when working with the wet on wet royal icing technique.
✔️ Use extra meringue powder in your royal icing – My royal icing recipe (available in the Cookie Art Club) has about double what most recipes call for. This allows me to work with the icing longer before it starts to crust over (up to 10 minutes depending on the weather!).
Read my Ultimate Guide To Royal Icing to learn all about royal icing consistencies.
✔️ Make sure your icing is the right consistency – Getting the right consistency is one of the most difficult things about decorating cookies with royal icing. I use 15-20 second count icing.
To test the consistency, take a scoop of icing out of the bowl and drop it back in. It should take 15 to 20 seconds to be completely smooth. This is what’s known as Flood Consistency Royal Icing.
✔️ Use your tools to help you – Even if your icing recipe and icing consistency are perfect, you might still have issues with the icing crusting too quickly. When this happens, you can use your scribe tool or a toothpick to pat down those annoying little peaks.
You can also use your scribe tool to help get rid of excess icing. If you find it running over the edges, let it crust over for about 15 minutes, then use your scribe tool to remove the runaway icing. Any jagged edges can be covered up with a border 🙂
Here’s what you’ll need to make these Valentine’s Day decorated sugar cookies
- Chilled sheet of cookie dough (recipe in the Cookie Art Club)
- 1 batch of royal icing
- 3.25” heart cookie cutter
- 4 decorating bags
- 4 couplers
- 4 decorating tip 3
- 4 bag ties
- Scribe tool
- Chefmaster food coloring
- Golden Yellow
- Super Red
- Teal Green


Instructions
- Cut the cookies from a chilled sheet of cookie dough.
- Bake the cookies at 350˚ Fahrenheit for 10-12 minutes. Allow them to cool completely before decorating.
- Sift the royal icing mix and make the icing according to the instructions on the package. The icing should hold a stiff peak.
- Add a teaspoon of water at a time to the royal icing to thin it to flood consistency.
- To test the consistency, take a scoop of icing out of the bowl and drop it back in. It should take 15 to 20 seconds to be completely smooth.
- Separate 3 tablespoons of icing and color it with 2 drops of golden yellow food coloring.
- Color 2 tablespoons of icing with 3 drops of red food coloring.
- Color 3 tablespoons of icing with a little bit of the red icing to make pink.
- Color the remaining icing with 1 or 2 drops of teal food coloring.
- Fit 4 decorating bags with a coupler and a tip 3 and fill them with teal, pink, red, and yellow icing.
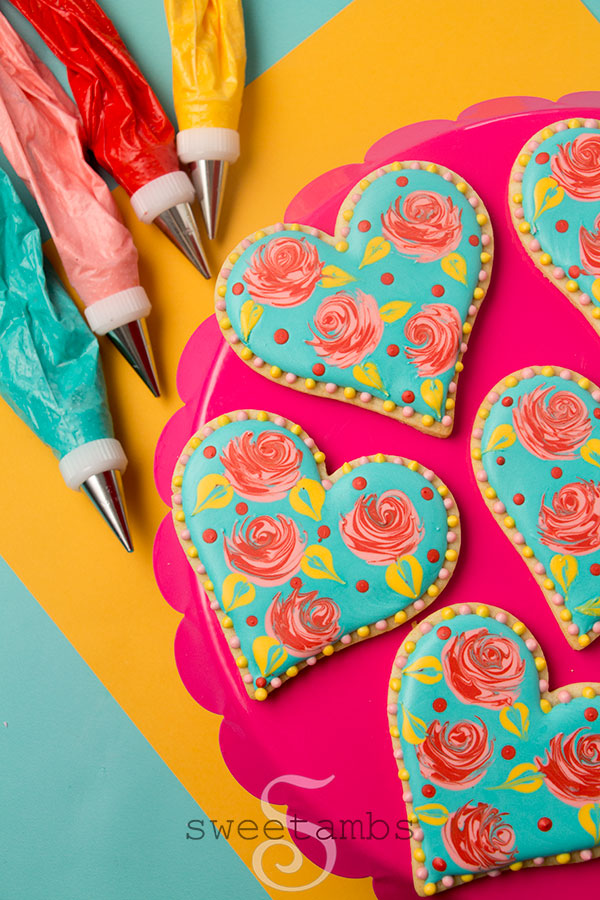
- Ice a heart cookie with teal flood consistency royal icing and a decorating tip 3.
- Use a scribe tool to help shape the icing.
- Pipe ovals of pink icing while the base layer is still wet.
- Pipe swirls of red icing in the pink ovals while the base layer is still wet.
- Swirl the colors together to form a rose.
- Pipe dots of yellow next to the roses and drag the scribe tool through the dots to form leaves.
- Add a dot of teal and drag the scribe tool through the icing again.
- Pipe dots of red icing in the space around the roses.
- Allow the icing to dry for about an hour.
- Pipe a dot border around the edge with yellow and pink flood consistency icing.
- Allow the icing to dry overnight before packaging the cookies.
