Painting on Royal Icing with Food Coloring


There are a few things to keep in mind before you start painting on royal icing with food coloring. See below for my tips along with the full tutorial and supply list. After the video, check out my friend Haniela’s gorgeous cake decorated with meringue pansies!
Become a subscriber to get this tutorial ad-free along other members-only benefits including access to my cookie and royal icing recipe, Premium Video Tutorials, and individualized cookie decorating advice!

When painting on with food coloring, it’s very important that you start with a smooth royal icing surface. If the icing is porous, the paint will be absorbed and it will look blotchy.
To prevent porous royal icing, follow these tips:
- Don’t over-mix your icing. Mix it on medium-low speed for no more than 5 minutes. I use speed 2 on my stand mixer.
- Don’t thin your icing too much. When thinning your icing to flood consistency, add the water a tablespoon at a time until you reach 15-20 second count. See my video on royal icing consistencies in the Premium Video Tutorials for detailed instructions.
- Dry the cookies in front of a fan and let the icing dry completely before painting. The faster the icing dries, the better. Try not to use a dehydrator as the heat can cause the butter in the cookie to melt and stain the icing.
See my Ultimate Guide To Royal Icing for more tips.
Supplies for painting on royal icing with food coloring
- Chilled sheet of cookie dough
- Ann Clark 4.25″ Square Plaque Cookie Cutter
- Flood consistency royal icing in white
- 12″ decorating bag
- Coupler
- Decorating tip 3
- Bag tie
- Scribe tool
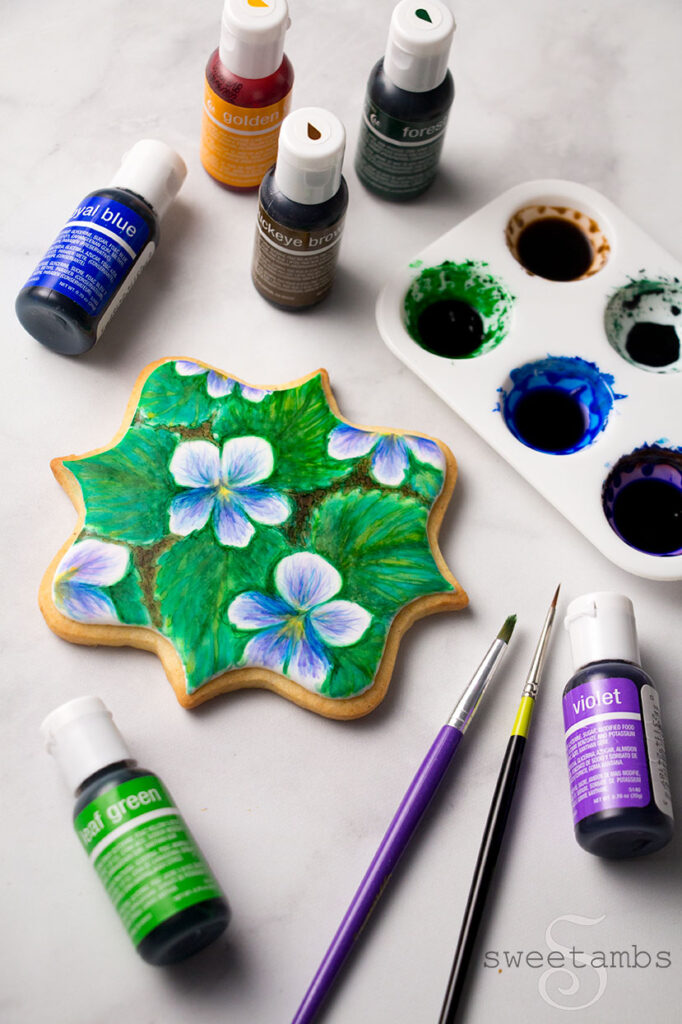
- Food coloring (I used Chefmaster Violet, Royal Blue, Leaf Green, Forest Green, Golden Yellow, and Buckeye Brown)
- Strong vodka or grain alcohol (I used Devil’s Spring 151 proof vodka)
- Paint palette or small dishes for mixing paint
- Round decorator brush (I used one from the Wilton 5 piece set)
- Thin artist brush
- Paper towel to blot brushes
- Dish of water to rinse brushes in between colors
Instructions
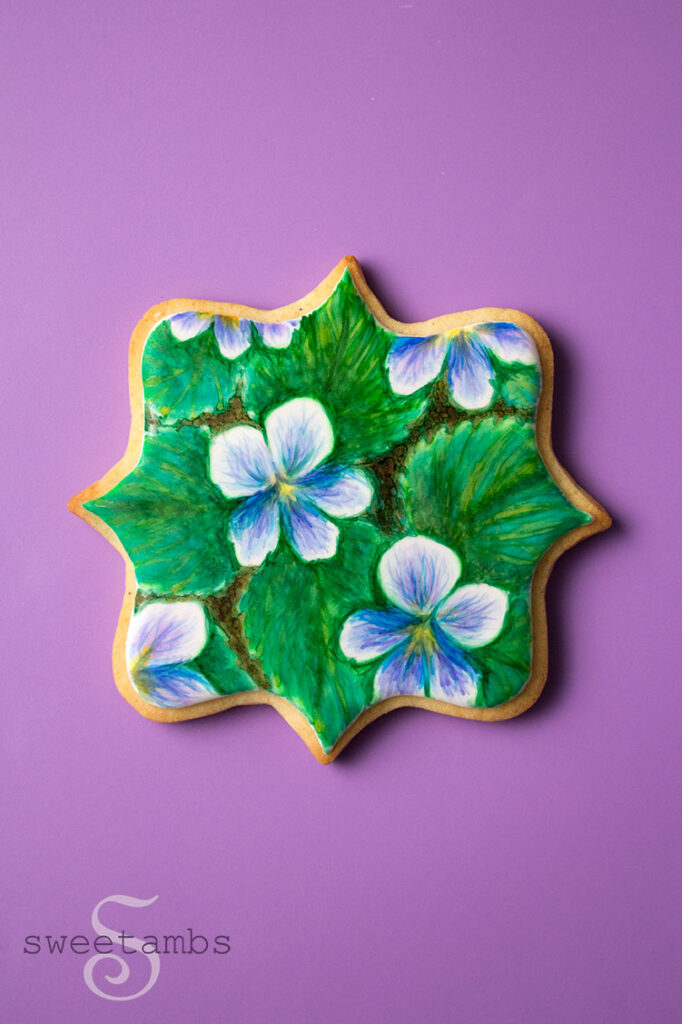
- Begin by icing a cookie with flood consistency royal icing and a decorating tip 3.
- Use a scribe tool to help shape the icing. Allow the icing to dry completely (overnight is best).
- Mix food coloring with vodka or grain alcohol (Alcohol is used for painting on royal icing because it evaporates very quickly, which means that the liquid won’t dissolve the icing as you are applying the paint. The stronger the alcohol, the better!)
- Lightly dip the brush into the paint and blot it on a paper towel.
- Apply the paint in layers, starting with a very light layer of color. Keep a photo of the flowers nearby to refer to as you paint.
- Use the thin brush to paint fine details.
- Use a damp brush to remove the paint if necessary.

Print it or Pin it!
Painting on Royal Icing with Food Coloring


Learn to paint on royal icing with food coloring. These supplies are in my Amazon Store unless otherwise noted.
Materials
- Chilled sheet of cookie dough
- Ann Clark 4.25" Square Plaque Cookie Cutter
- Flood consistency royal icing in white
- 12" decorating bag
- Coupler
- Decorating tip 3
- Bag tie
- Scribe tool
- Food coloring (I used Chefmaster Violet, Royal Blue, Leaf Green, Forest Green, Golden Yellow, and Buckeye Brown)
- Strong vodka or grain alcohol (I used Devil's Spring 151 proof vodka)
- Paint palette or small dishes for mixing paint
- Round decorator brush (I used one from the Wilton 5 piece set)
- Thin artist brush
- Paper towel to blot brushes
- Dish of water to rinse brushes in between colors
Instructions
- Begin by icing a cookie with flood consistency royal icing and a decorating tip 3.
- Use a scribe tool to help shape the icing. Allow the icing to dry completely (overnight is best).
- Mix food coloring with vodka or grain alcohol (Alcohol is used for painting on royal icing because it evaporates very quickly, which means that the liquid won’t dissolve the icing as you are applying the paint. The stronger the alcohol, the better!)
- Lightly dip the brush into the paint and blot it on a paper towel.
- Apply the paint in layers, starting with a very light layer of color. Keep a photo of the flowers nearby to refer to as you paint.
- Use the thin brush to paint fine details.
- Use a damp brush to remove the paint if necessary.
Notes
It's very important that you start with a smooth icing base. If your icing is porous, the paint will be absorbed and look blotchy.
Head over to Haniela’s to see her tutorial on how to create meringue pansies!


Click on the images below for more cookie projects.