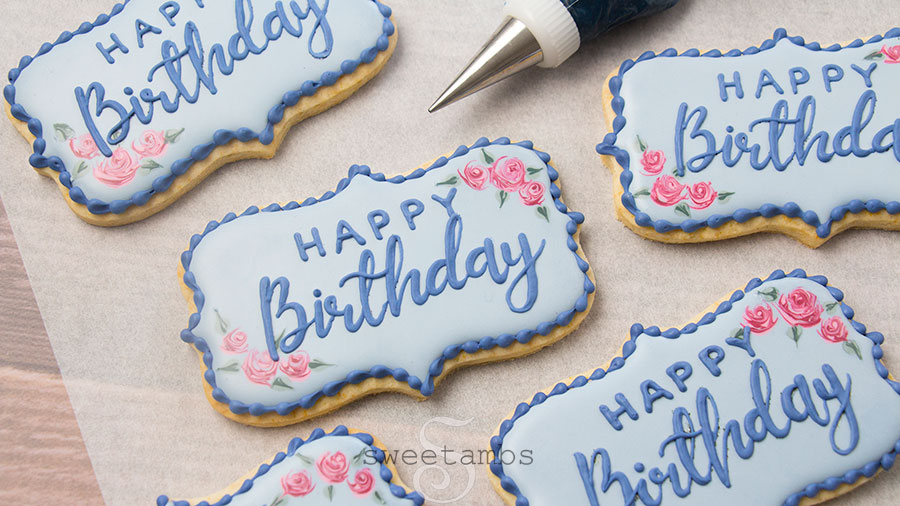
This is my very low-tech way to write on cookies without a projector using royal icing. I call it the tissue paper method because it uses - you guessed it - tissue paper! 😁 This technique works with almost any design as you can see in these NYC skyline cookies and this stained glass rose cookie.
Get access to exclusive cookie decorating tutorials, my cookie and royal icing recipes, and individualized cookie decorating advice by joining my Cookie Art Club!
This post contains affiliate links. Read my affiliate disclosure here.
Download the printable supply list and instructions from my Ko-Fi shop

How Do You Write On Cookies Without A Projector?
For this method, you'll trace the template onto the tissue paper with an edible ink marker (I used FooDoodler brand for this project).

Then, you'll place the tissue paper over the cookie and trace it again. The ink will bleed through the paper onto the cookie. This is just standard tissue paper that you would use in a gift bag. You do have to make sure it doesn't have a glossy or waxy finish otherwise this technique won't work. I get my tissue paper from Nashvillewraps.com.

What consistency should royal icing be for writing?
I use medium consistency royal icing to write on cookies. The icing holds a soft peak. It should be thin enough that it comes out of a small piping tip easily, but not so thin that it loses its shape. Getting the right consistency is one of the most difficult things about decorating cookies so don't give up if you don't get it right the first few times.
Read my Ultimate Guide To Royal Icing to learn all about royal icing consistencies.
Here's what you'll need to write on cookies without a projector
Download the printable supply list and instructions from my Ko-Fi shop
- Chilled sheet of cookie dough
- 4.25" plaque cookie cutter
- Stiff consistency royal icing plus water for thinning (I used 1-¼ cups of icing for a set of 8 cookies)
- Decorating tip 3
- Decorating tip 1.5
- Decorating tip 2
- Couplers
- Bag ties
- Tipless decorating bags
- Chefmaster food coloring in Navy Blue, Burgundy Wine, and Forest Green
- Scribe tool
- Happy Birthday template
- Edible ink marker
- Tissue paper

Instructions
- Cut the cookies from a chilled sheet of cookie dough. Bake them at 350˚F for 10-12 minutes. Allow them to cool completely before decorating.
- Thin 1 cup of stiff consistency icing to flood consistency by adding a teaspoon of water at a time.
- Color 2 tablespoons of the flood consistency icing with Burgundy Wine food coloring. Add a small amount of this burgundy icing to 2 tablespoons of white flood consistency icing to make a light shade of pink.
- Color 1 tablespoon of flood consistency icing with Forest Green food coloring and a very small drop of Burgundy Wine to make dark green. Add a small amount of this dark green icing to 2 tablespoons of white flood consistency icing to make a light shade of green.
- Color the remaining flood consistency icing with Navy Blue food coloring and a very small drop of Burgundy Wine to make light blue.
- Fit a decorating bag with a coupler and a decorating tip 3 and fill it with the light blue icing. Fill tipless bags with the burgundy, light pink, dark green, and dark green icing.
- Cut a small opening in your tipless bags.
- Ice the cookie with light blue flood consistency royal icing and a decorating tip 3. Use a scribe tool to help shape the icing.
- Pipe circles of light pink flood consistency royal icing while the base layer is still wet.
- Add swirls of burgundy icing. Use the scribe tool to swirl the icing and shape it to look like a rose.
- Add dots of light green icing for the leaves.
- Pipe a smaller dot of dark green icing on top. Drag the scribe tool through the green dots to shape them into leaves. Allow the icing to dry overnight.
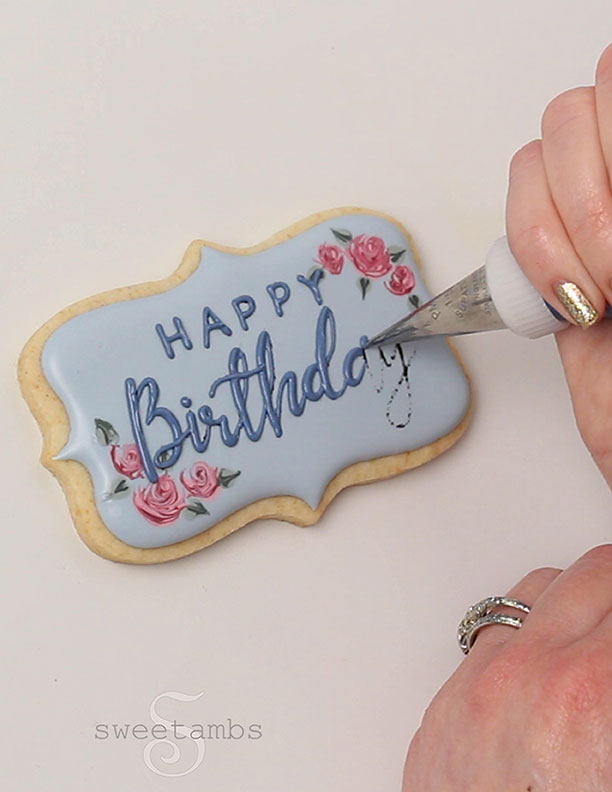
- Print the template and place a piece of tissue over it. This is just standard tissue paper that you would use in a gift bag.
- Trace the lettering with an edible ink marker.
- Place the tissue paper over the cookie. Trace it again with the edible ink marker. Press hard enough so that the ink bleeds through the tissue paper onto the icing.
- Add a few drops of water to ¼ cup of stiff consistency icing to thin it to medium consistency. The icing should hold a soft peak.
- Pipe over the lettering with the medium consistency icing and a small decorating tip.
- Use light pressure and hold your piping hand steady by resting your forearm on the table. Use a scribe tool to help shape the icing.
- When piping in cursive, use heavier pressure on the downstrokes of the letters to make those areas thicker.
- Switch the tip on the medium consistency icing to a number 2.
- Pipe a bead border around the edge of the cookie.
My Cookie Art Club members can watch my detailed tutorials on wet-on-wet royal icing roses and how to pipe a bead border.

Does any of the tissue paper stick to the cookie while tracing? Since tissue is not edible, I’m wondering if rice paper would work.
Hi Amber,
What type of projector do you use? I know this cookie is the tissue transfer, but saw another one where you used the projector.
Thanks,
Evonne
I don't use a projector, here is a post of what I do instead☺️
http://www.sweetambs.com/tutorial/how-to-write-on-cookies-without-a-projector/
Thank you Amber for your tutorials on bubbles and printing sans a projector!
I'm glad it was helpful!
Thank you for the helpful hint! I appreciate the edible maker suggestion as well, since I have yet to invest in one.
Thanks for sharing this great method of writing without a projector, I'm going to try to do it today
I'm glad it was helpful!
This is a great lie tech technique...but my hands are just not steady enough...I can cut a stencil in the front and size I need and then just just swipe royal icing across or use the airgun
Stencils are another great way to apply lettering. I recently bought a Silhouette Portrait and I’m experimenting with cutting my own stencils. It’s fun! 🙂
This is just wonderful! I can't wait to give it a try. I haven't invested in a projector yet, so this will be a great practice also for lettering. You are brilliant! Thank you.
Thank you, Marie! 🙂