Saint Patrick’s Day Cookies | Shamrocks and Mason Jar


These Saint Patrick’s Day cookies are a spin on my Valentine’s Day mason jar cookies that I made last year. You could even change the colors and shapes on these cookies to fit other holidays like Easter and Christmas!
See the video tutorial, supply list, and instructions below!
Get access to exclusive cookie decorating tutorials, my cookie and royal icing recipes, and individualized cookie decorating advice by joining my Cookie Art Club!
This post contains affiliate links. Read my affiliate disclosure here.


Here’s what you’ll need to make these Saint Patrick’s Day Cookies
- Chilled sheet of cookie dough (get my recipe in the Cookie Art Club)
- 1 batch of royal icing (get my recipe in the Cookie Art Club
- Mason jar cookie cutter
- Shamrock cookie cutter
- Decorating tip 1 and Decorating tip 3
- 4 Decorating bags
- 4 Bag ties or rubber bands
- Green edible ink marker
- Scribe tool
- Gold luster dust
- Vodka or grain alcohol to mix with luster dust (I use Devil’s Spring 151 Proof Vodka)
Read this post to learn more about painting with food coloring on royal icing.
- Decorator brushes
- Paint palette or small dish for mixing paint
- Wax paper or parchment paper
- Chefmaster food coloring
- Leaf Green
- Forest Green
- Neon Brite Green
- Lemon Yellow
- Buckeye Brown
Read my Ultimate Guide To Royal Icing to learn all about royal icing consistencies.

Instructions
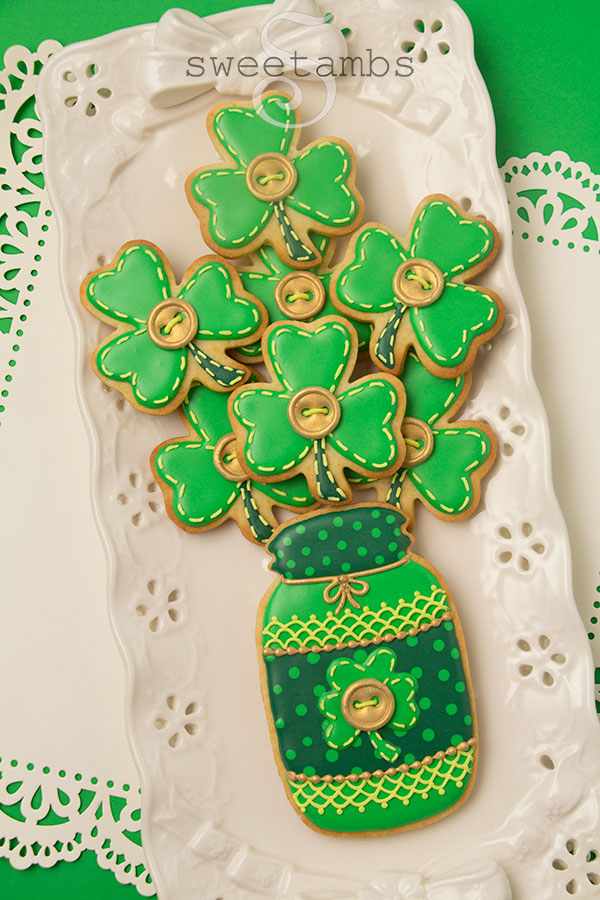
- Cut the cookies from a chilled sheet of cookie dough. I made 7 shamrocks and 1 mason jar for this project.
- Make a batch of royal icing from scratch or a mix. The icing should hold a stiff peak.
- Add a teaspoon of water at a time to 1-¼ cups of royal icing to thin it to flood consistency. To test the consistency, take a scoop of icing out of the bowl and drop it back in. It should take 15 to 20 seconds to be completely smooth.
- Add 4 drops of leaf green food coloring to 1 cup of flood consistency icing.
- Add 6 drops of forest green food coloring to ¼ cup of flood consistency icing.
- Place the forest green icing into a decorating bag fitted with a coupler and a decorating tip 3. Secure the top with a bag tie or rubber band.
- Place the leaf green icing into a decorating bag fitted with a coupler and a decorating tip 3. Secure the top with a bag tie or rubber band.
- Use an edible ink marker to draw a band in the center of the jar cookie and draw one line to separate the lid.
- Fill in the area above and below the band with the leaf green icing. Use the scribe tool to help shape the icing.
- Switch the tip on the leaf green from a 3 to a 1.
- Fill in the band with the forest green icing. Use the scribe tool to help shape the icing.
- Pipe dots with the leaf green icing and tip 1 while the forest green icing is still wet.
- Fill in the lid with the forest green icing and tip 3. Use the scribe tool to help shape the icing.
- Pipe dots with the leaf green icing and tip 1 while the forest green icing is still wet.
- Switch the tip on the leaf green icing back to a 3 and use it to ice the shamrock cookies. Use the scribe tool to help shape the icing.
- Switch the tip on the forest green icing from a 3 to a 1.
- Ice the stem with the forest green icing.
- Add 1 drop of brown and 1 drop of yellow food coloring to ¼ cup of stiff consistency icing.
- Add ½ teaspoon of water to thin it to medium (soft peak) consistency.
- Place the golden brown icing into a decorating bag fitted with a coupler and a decorating tip 1. Secure the top with a bag tie or rubber band.
- Trace the wide end of a decorating tip on a piece of paper to make a template for the buttons. Slide the template underneath a piece of parchment or wax paper.
- Fill in the buttons leaving two holes in each one. Use the scribe tool to help shape the icing. Make one button for each cookie plus extras in case of breakage. Allow the buttons to dry for about 20 minutes.
- Pipe an outline on each button with the golden brown medium consistency icing. Allow the buttons and all of the cookies to dry completely (overnight is best).
- Combine edible gold luster dust with a few drops of vodka or grain alcohol.
- Use a decorator brush to apply the edible gold paint to the buttons.
- Remove the buttons from the paper.
- Use the scribe tool to draw a shamrock on the mason jar cookie.
- Fill in the shamrock with leaf green flood consistency icing and a tip 1. Use the scribe tool to help shape the icing. Allow the icing to dry for about an hour.
- Add 1 drop of neon green food coloring to ¼ cup of stiff consistency icing. Add ¼ teaspoon of water to soften it.
- Place the icing into a decorating bag fitted with a coupler and a decorating tip 1.
- Use the light green icing to pipe stitches on the shamrock.
- Pipe a little bit of icing on the back of the button and attach it to the cookie.
- Pipe 1 thread in the button holes.
- Use the light green icing and tip 1 to pipe a lace design above and below the band on the mason jar cookie.
- Pipe stitches on the shamrock cookies.
- Pipe a little bit of icing on the back of the button and attach it to the cookie.
- Pipe 1 thread in the button holes.
- Add one small scoop of stiff consistency icing to the remaining golden brown icing to thicken it.
- Place the icing into a bag fitted with a coupler and a decorating tip 2.
- Pipe a line of golden brown icing along the bottom of the lid.
- Add a bow in the center.
- Pipe a bead border along the top and bottom edge of the band on the jar. Allow the icing to dry for about 30 minutes.
- Use a thin decorator brush to apply the edible gold paint to the golden brown icing.
- Arrange the cookies on a platter.


Subscribe
Login
0 Comments
Subscribe
0 Comments