My set of Easter cookies this year contains lots of ruffles, ribbons and roses. Here's a tutorial on how I made this royal icing ruffle Easter egg.
For decorating products used in this and other tutorials, visit the recommended products page.
 Photo by super9Films
The cutter I used for this egg shape is the Wilton Comfort-Grip Egg Cookie Cutter, which measures about 4-½" tall. My cookie and royal icing recipe are available in my tutorial shop.
Start out by icing the cookie in flood consistency royal icing and allow it to dry overnight. The color shown here is delphinium blue from the Wilton Garden Tone 4-Piece Colors Set. You can also achieve this color by mixing royal blue with a touch of black.
Use a scribe tool to mark a guide in the icing where your ruffles will be. The lower guide should be about 1-¼" so that it can fit 3 rows of ruffles. The top section will hold 2 layers, so that one can be a little more narrow.
Photo by super9Films
The cutter I used for this egg shape is the Wilton Comfort-Grip Egg Cookie Cutter, which measures about 4-½" tall. My cookie and royal icing recipe are available in my tutorial shop.
Start out by icing the cookie in flood consistency royal icing and allow it to dry overnight. The color shown here is delphinium blue from the Wilton Garden Tone 4-Piece Colors Set. You can also achieve this color by mixing royal blue with a touch of black.
Use a scribe tool to mark a guide in the icing where your ruffles will be. The lower guide should be about 1-¼" so that it can fit 3 rows of ruffles. The top section will hold 2 layers, so that one can be a little more narrow.
 Using a petal tip #103 and stiff consistency icing, pipe the first ruffle just above the bottom line of your lower guide. To see this in process action, visit my shop for a video on how to pipe ruffles.
 Pipe the next ruffle above the first one. You don't need to wait for the ruffles to dry before layering them.
 After you've piped the third ruffle, use a square tip brush, such as the one from the Wilton 3 piece Decorator Brush Set, to smooth out the top edge. This will create a smooth surface so that you can pipe a bead border later.
 Next, pipe 2 rows of beads using stiff consistency icing and a tip 2. A video on with full instructions on how to pipe a bead border is available in my shop.
 Allow the ruffles and bead border to dry for about 6 hours. Then, using a mixture of gold pearl dust and alcohol or flavored extract (I use Bacardi 151), paint the edges of the ruffles. Read my post on how to make gold royal icing to learn more about this process.
 Paint the bead border with a mixture of alcohol and white pearl dust. I'm using a size 3/0 paint brush.
 Allow the "paint" to dry for about 20 minutes.
 Photos by super9Films
Click on the images below for more cookie projects.
Photos by super9Films
Click on the images below for more cookie projects. 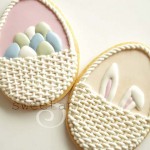

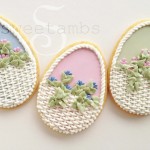
Photo by super9Films
The cutter I used for this egg shape is the Wilton Comfort-Grip Egg Cookie Cutter, which measures about 4-½" tall. My cookie and royal icing recipe are available in my tutorial shop.
Start out by icing the cookie in flood consistency royal icing and allow it to dry overnight. The color shown here is delphinium blue from the Wilton Garden Tone 4-Piece Colors Set. You can also achieve this color by mixing royal blue with a touch of black.
Use a scribe tool to mark a guide in the icing where your ruffles will be. The lower guide should be about 1-¼" so that it can fit 3 rows of ruffles. The top section will hold 2 layers, so that one can be a little more narrow.
Using a petal tip #103 and stiff consistency icing, pipe the first ruffle just above the bottom line of your lower guide. To see this in process action, visit my shop for a video on how to pipe ruffles.
Pipe the next ruffle above the first one. You don't need to wait for the ruffles to dry before layering them.
After you've piped the third ruffle, use a square tip brush, such as the one from the Wilton 3 piece Decorator Brush Set, to smooth out the top edge. This will create a smooth surface so that you can pipe a bead border later.
Next, pipe 2 rows of beads using stiff consistency icing and a tip 2. A video on with full instructions on how to pipe a bead border is available in my shop.
Allow the ruffles and bead border to dry for about 6 hours. Then, using a mixture of gold pearl dust and alcohol or flavored extract (I use Bacardi 151), paint the edges of the ruffles. Read my post on how to make gold royal icing to learn more about this process.
Paint the bead border with a mixture of alcohol and white pearl dust. I'm using a size 3/0 paint brush.
Allow the "paint" to dry for about 20 minutes.
Photos by super9Films
Click on the images below for more cookie projects.
Hello could you please send me the recepie for royal icing, I would be greatfull!!!
I can't say it enough… I'm so in love ❤ with your beautiful talented work… thank you for sharing… and for suggesting… I do have a question ❔ I want to color some of my Easter eggs gold… where can I find a gold color for my icing… do you create your own gold color?
Thank you, Rosie! This post has information on how to create gold royal icing: https://www.sweetambs.com/tutorial/gold-royal-icing/
I have never tasted a cookie like yours, with royal icing. Sincere question: is it delicious?, or just sweet and tolerable for the pleasure of the beautiful design?
They are the best tasting sugar cookie I've ever had.
Thank you so much, Barb!
You should sell them, maybe try Etsy. They are totally beautiful.
Thanks Diane! I used to sell my cookies on Etsy, but now I focus only on teaching cookie decorating classes and producing online tutorials.
Maravilloso trabajos, felicitaciones. Desde Mendoza Argentina puedo tus bellezas.
works of art and far too good to eat. how wonderful you are too share with us. Very talented so beautiful in creating such a wonderful looking thing.
That's so sweet of you to say, Dianne. Thank you!
Beautiful!!! Thanks for share things that you know. Hugs,
I just say is beautiful, beautiful, beautiful , the Lord bless you.