How To Decorate Makeup Cookies!
 —
—
—
It’s been so long since I posted a new tutorial! I took a little break last week to teach a private cookie decorating class to a couple of lovely ladies who came to visit me at my cookie studio all the way from Texas. Now I’m back to share these fab makeup cookies with you!
This post contains affiliate links. Read my affiliate disclosure here.
Here’s what you’ll need to make these makeup cookies with royal icing
- Chilled sheet of roll out cookie dough (my Orange Vanilla Cardamom cookie recipe is available to my Patreon Subscribers)
- Makeup cookie cutters
- Flood consistency royal icing in black, gray, white, hot pink, tan, and teal
- Medium consistency royal icing in brown
- Stiff consistency royal icing in white
- 12″ decorating bags
- Decorating tips 2 and 3
- Scribe tool
- White, bronze, and gold pearl dust
- Pink color dust (matte)
- Square tip brush, soft round brush, fine tip brush
- Alcohol or flavored extract for painting with pearl dust (read this post to learn why it’s best to use alcohol for painting on royal icing)
- Paint palette or small dishes
Colors: The Wilton Color Right color system was used to create all of the icing colors in this set.
- Teal = blue + yellow
- Hot pink = pink + red
- Black
- Gray = a touch of black
- Brown
- Tan = a touch of brown
–In
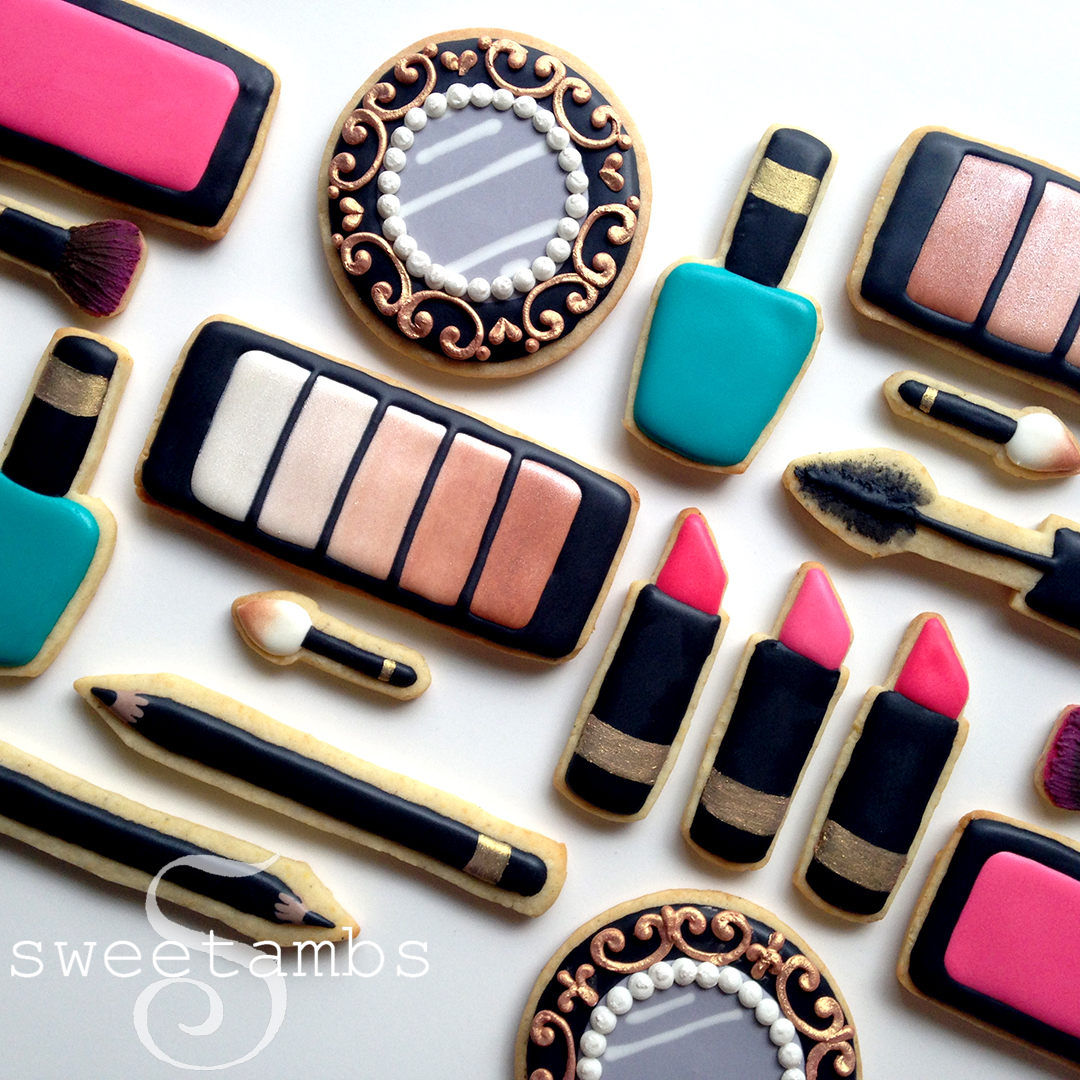
Instructions:
- Cut the cookies out of a chilled sheet of cookie dough using the cookie cutters. Bake the cookies according to the recipe instructions.
Eyeshadow Palette
- To make the eyeshadow palette, ice the large rectangular cookie with white flood consistency royal icing and a decorating tip 2.
- Use the scribe tool to help shape the icing. Allow the icing to dry completely.
- Mix white and bronze pearl dust to create 3 different shades of champagne.
- Add a few drops of alcohol or flavored extract.
- Apply the paint to the icing, lightest to darkest, with a soft brush.
- Pipe an outline with black flood consistency royal icing and a decorating tip 2.
- Use the scribe tool to help shape the icing.
- Eyeshadow Applicator
- To make the eye shadow applicator, fill in the top portion with white flood consistency royal icing and a tip 2. Allow the icing to dry for about 30 minutes.
- Ice the handle with black flood consistency royal icing and a tip 2. Allow the icing to dry completely.
- Color the eyeshadow applicator with dry bronze pearl dust.
Blush Palette
- To make a blush palette, ice the smaller rectangular cookie with pink flood consistency icing and a tip 2.
- Use the scribe tool to help shape the icing. Allow the icing to dry completely.
- Outline the cookie with black flood consistency royal icing and a decorating tip 2.
Blush Brush
- To make a blush brush, apply a small amount of brown medium consistency royal icing with a tip 2.
- Use a damp square tip brush to drag the icing toward to edge.
- Ice the handle with black flood consistency royal icing and a tip 2. Allow the icing to dry completely.
- Color the edge of the brush with pink dust.
Eyeliner Pencil
- To make an eyeliner pencil, ice a pencil-shaped cookie with black flood consistency royal icing and a tip 2, leaving the tip bare.
- Add tan flood consistency icing to the tip and use a scribe tool to drag the black icing into 4 points.
- Pipe a dot of black icing on the very end of the pencil and use the scribe tool to bring it to a point.
Lipstick
- To make the lipstick, fill in the top portion with pink flood consistency royal icing and a tip 2. Allow the icing to dry for about 30 minutes
- Fill in the rest with black flood consistency royal icing and a tip 2.
Mascara
- To make the mascara cookie, fill in the handle with black flood consistency royal icing and a tip 2.
- Pipe a thin line to the tip of the cookie for the wand.
- Use a damp square tip brush to drag the icing out toward the edges to form the bristles on the wand.
Nail Polish
- For the nail polish, fill the cookie with teal flood consistency royal icing and at tip 2.
- Use the scribe tool to help shape the icing. Allow the icing to dry for about 30 minutes.
- Fill in the handle with black flood consistency royal icing and a decorating tip 2.
Mirror
- To make the mirror, ice the center of the round cookie with gray flood consistency royal icing and a tip 2.
- Use the scribe tool to help shape the icing.
- Pipe a few lines of white flood consistency icing while the gray icing is still wet. Allow the icing to dry for about 30 minutes.
- Fill in the edge of the cookie with black flood consistency royal icing and a tip 2. Allow the icing to dry completely.
- Use the scribe tool to draw 4 evenly spaced marks on the black icing. This will be a guide for piping the filigree design around the edge.
- Pipe the design with brown medium consistency royal icing and a tip 2. Allow the icing to dry for about 30 minutes.
- Paint the brown icing with a mixture of gold pearl dust and alcohol or flavored extract,
- Pipe a pearl border with white stiff consistency royal icing and a tip 3. Allow the icing to dry for about 30 minutes.
- Paint the white icing with a mixture of white pearl dust and alcohol or flavored extract.
- Paint a gold stripe to the black icing on the rest of the cookies.
—
This post was originally published in August of 2015

Subscribe
Login
0 Comments
Subscribe
0 Comments