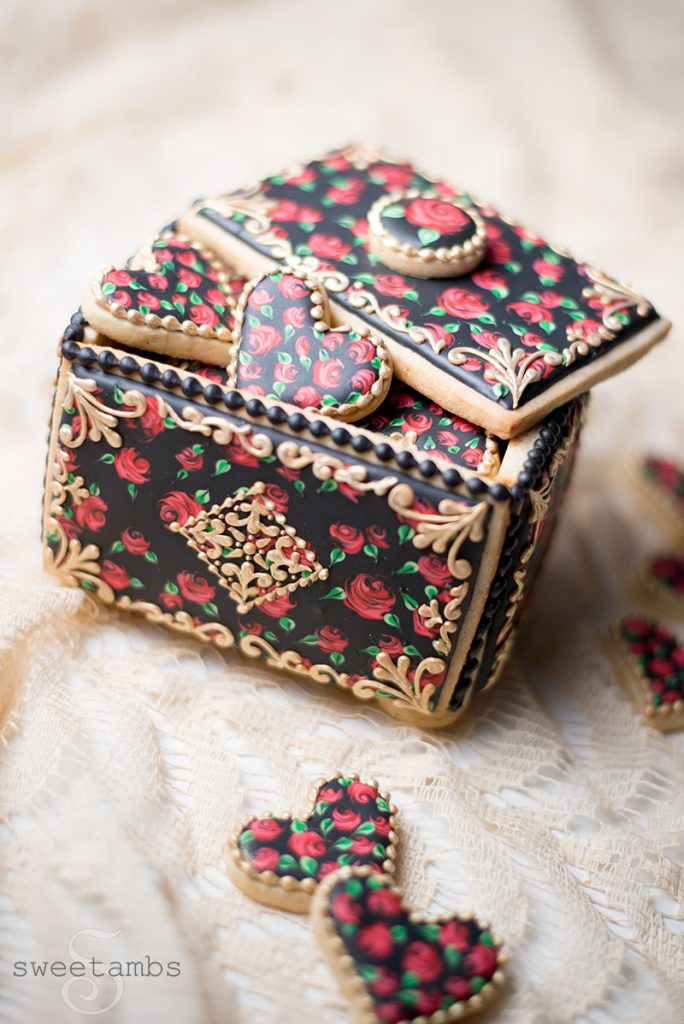
Edible Cookie Box for Valentine’s Day! (Cookie Art Club Premium Tutorial)
I love, love, love making cookie boxes! They take a lot of time and patience to complete, but they make such beautiful gifts.
You can watch this members-only video tutorial (without ads!) when you join my Cookie Art Club!
Get access to exclusive cookie decorating tutorials, my cookie and royal icing recipes, and individualized cookie decorating advice by joining my Cookie Art Club!
This Valentine’s Day cookie box utilizes the wet-on-wet technique to make the rose pattern on the outside of the box as well as on the heart cookies that are inside.
This post contains affiliate links. Read my affiliate disclosure here.

Here’s what you’ll need for this project. Find these supplies in my Amazon store.
- Roll Out Cookie Dough
- Box Templates (below)
- Mini heart cookie cutter
- Flood consistency royal icing in black, red, pink, light green and dark green
- Medium consistency royal icing in golden brown and black
- Liquid Gold Shine from TruColor LLC (more on this product below)
- Decorating bags
- Decorating tips Wilton 3, PME 1.5, and Wilton 5
- Scribe tool
- Wilton Color Right set
- Crystal Colors dust in Charcoal – In addition to the black color from the Wilton Color Right set, I added black dust to help achieve a very black icing.
—


The gold paint that I used in this tutorial is a new product from TruColor LLC, makers of natural food coloring. I visited their booth at CookieCon last September and they generously gave me a sample to try out. As soon as I got home I bought 4 more colors!
TruColor’s Liquid Gold Shine comes pre-mixed with organic cane alcohol. I’d never used a pre-mixed gold before and I found that it was a bit too thin for me, but the alcohol evaporates very quickly, so after a few minutes of sitting in the palette it started to thicken a bit.


I kept the leftover gold in the palette to dry completely and then just reconstituted it with Everclear the following day to use it again. Read this post on how to make gold royal icing to learn all about the process and why it’s important to use alcohol on royal icing (as opposed to water or other liquid).


You have to work quickly with the wet-on-wet technique in order to get all of the roses finished before the icing starts to crust over. During the dry winter months, I find that I have about 4-5 minutes to work with the icing.
It’s definitely easier to work with small cookies like the mini hearts that are inside the box. The sides and lid of the box are about 4-1/2″, which is a lot of icing to manage at once. When working with a larger cookie, I concentrate on the roses around the edges first because that’s where the icing is going to crust over the fastest. If you do have some peaks of icing at the end, just pat them down with the scribe tool.
—
Pin this project for later!


—
