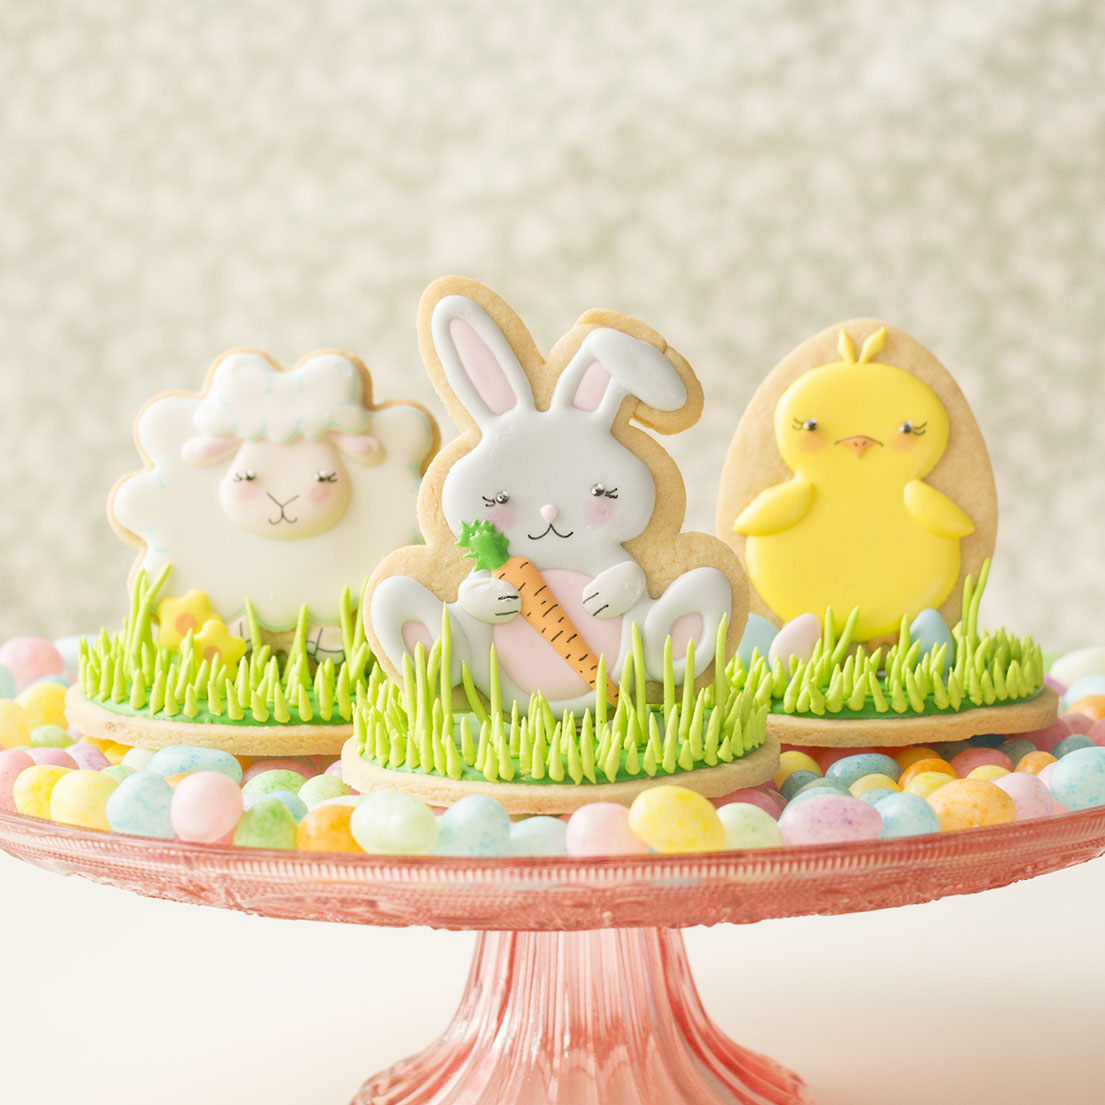
Easter Baby Animal Cookies with Domino Sugar!
I can’t wait to see the look on my daughter’s face when she sees these cookies on Easter morning! To make them, I partnered with Domino Sugar and used their brown sugar cutout cookie recipe. Learn how to make your own by following the tutorial!
Supplies
- Brown Sugar Cookie Recipe: https://www.dominosugar.com/recipe/brown-sugar-cutout-cookies
- Royal Icing Recipe: https://www.dominosugar.com/recipe/royal-icing-meringue-powder
4” Bunny Cookie Cutter
3” 10-petal Flower Cookie Cutter
3” Egg Cookie Cutter
3 ¼” Round Cookie Cutter
Paring knife
15-second count royal icing in light pink, gray, black, white, orange, green, light peach, yellow, light blue (test the consistency by taking a spoonful of icing out of the bowl and dropping it back in. It should take about 15 seconds for the icing to be completely smooth)
Stiff peak royal icing in light green
12” decorating bags
Decorating tip numbers 1, 2, and 3
Couplers
Scriber needle or toothpick
Wax paper
Edible pink color dust
Black edible ink marker
Light blue edible ink marker
Decorator brush
Instructions
Cut the animal cookies from a sheet of brown sugar cookie dough. Use a paring knife to modify the bunny ear to make it “flop” over. Cut 1 round cookie for each animal cookie. Cut 1 triangle, 1 ½” long and 1” high, for each animal cookie using the paring knife. These will be the stands that hold the cookies upright. Bake and cool the cookies according to the recipe instructions.
To make the bunny, ice the inner ears, tummy, and foot pads with light pink 15-second count royal icing and a decorating tip number 2. Use a scriber needle or a toothpick to help shape the icing. Allow the icing to dry about 30 minutes.
Fill in the rest of the bunny with gray 15-second count royal icing and a decorating tip number 2. Use a scriber needle or a toothpick to help shape the icing. Allow the icing to dry about 1 hour.
Add dimension to the bunny by piping another layer of gray icing over the folded portion of the ear and over the feet. Allow the icing to dry 6 to 8 hours.
Pipe a nose with the light pink icing and use the scriber needle or toothpick to help shape it.
Add eyes with black 15-second count royal icing and a decorating tip number 1. Pipe reflections in the eyes with white 15-second count royal icing and a decorating tip number 1. Use a scriber needle or toothpick to apply a very small dot of white icing to add another reflection in each eye.
On a piece of wax paper taped to the work surface, pipe a carrot with orange and green 15-second count royal icing and a decorating tip number 1. Use the scriber needle or toothpick to shape the carrot. Repeat this process to pipe 3 eggs with light blue and light pink icing, and again to pipe 2 flowers using yellow icing for the petals and orange icing for the centers. The eggs and flowers will be used later. Allow the icing to dry 6-8 hours and carefully remove the decorations from the wax paper.
Attach the carrot to the bunny with a dab of 15-second count royal icing. Draw lines on the carrot with a black edible ink marker.
Use the edible ink marker to draw eyelashes and a mouth.
Add rosy cheeks by applying edible pink color dust with a decorator brush.
Pipe the bunny’s paws with gray icing and a decorating tip number 2. Allow the icing to dry about 30 minutes before drawing the details on the paws with the black edible ink marker.
To make the lamb, ice a 10-petal flower cookie with white icing and a decorating tip number 3. Use a scriber needle or toothpick to help shape the icing. Allow the icing to dry 6 to 8 hours.
Pipe the face with light peach 15-second count royal icing and a decorating tip number 2. Use a scriber needle or toothpick to help shape the icing. Pipe the ears with light peach icing. Add a little bit of light pink for the inner ears.
Use light peach icing to pipe the legs. Add hooves with gray icing and use the scribe tool to help shape them. Allow the icing to dry about 30 minutes.
Pipe fleece on top of the lamb’s head with white icing. Allow the icing to dry about 1 hour.
Add the details to the lamb’s face using the same process that was used to make the bunny’s face.
Outline the fleece with a light blue edible ink marker and add details to the legs and hooves with the black edible ink marker.
To make the chick, ice an egg cookie with yellow 15-second count royal icing and a decorating tip number 3. Use the scriber needle or toothpick to help shape the icing. Allow the icing to dry 6 to 8 hours.
Add dimension by piping another layer of yellow icing on the wings. To make feathers, pipe two dots of yellow icing over the chick’s head and shape the icing with the scriber needle or toothpick.
Pipe a beak and feet with orange icing and a decorating tip number 1 and shape the icing with the scriber needle or toothpick.
Add details to the chick’s face using the same process that was used to make the faces on the first two cookies.
To make stands for the animals, ice once round cookie for each animal cookie with green 15-second count royal icing and a tip number 3. Use the scriber needle or toothpick to help evenly distribute the icing. Allow the icing to dry 6 to 8 hours.
Apply light green stiff peak icing to the triangle cookie with a decorating tip number 3 and place it on the round cookie. Attach the animal cookie to the stand.
Attach the eggs and flowers to the bunny and lamb cookies using a dab of the light green icing.
Pipe blades of grass on the cookie base with the light green icing. Pipe the longer blades so that they rest against the animal cookies. The shorter blades can stand up on their own.
—
This post is sponsored by Domino Sugar

Subscribe
Login
0 Comments
Subscribe
0 Comments