3rd Birthday Cookies with Edible Sequins

My daughter’s 3rd birthday is just around the corner and I wanted to make a special set of cookies to celebrate using her favorite color (pink!) and her favorite character.
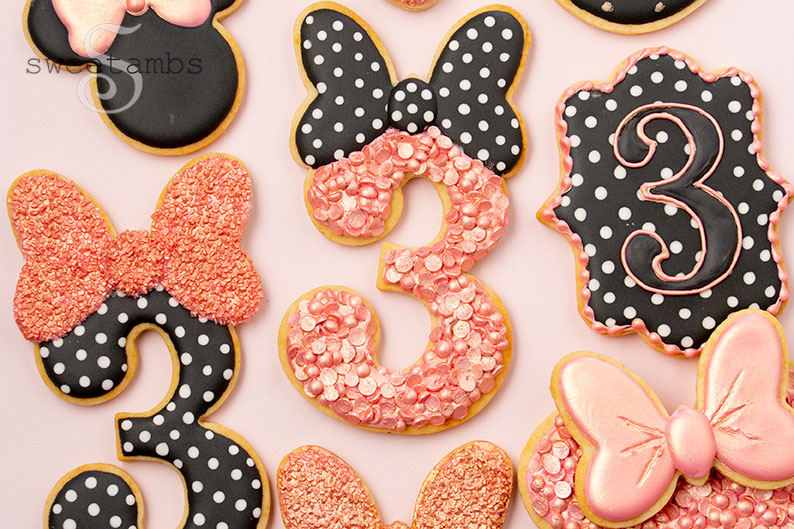
These Minnie Mouse inspired number 3 cookies are a combination of 2 cookie cutters. Watch the video and get the supply list below!
Get access to exclusive cookie decorating tutorials, my cookie and royal icing recipes, and individualized cookie decorating advice by joining my Cookie Art Club!
This post contains affiliate links. Read my affiliate disclosure here.
This sequin backpack is the inspiration behind these sparkly cookies. As soon as I saw it I knew it needed to be turned into a cookie!
The edible sequins on this number 3 cookie are made with royal icing and painted with luster dust. I used a combination of Blush Gold luster dust from Crystal Colors and Pink Gelato luster dust from Sweet Sticks to create this shade of rose gold.


Here’s what you’ll need to make these 3rd Birthday Cookies
- Chilled sheet of cookie dough (get my recipe in the Cookie Art Club)
- Bow and mouse cookie cutters
- Disco numbers cookie cutters from Cakes by Ximena
- Baking sheets and perforated baking mats
- Flood consistency royal icing in black, pink, and white
- Black edible ink marker
- Scribe tool
- 12” decorating bags with couplers
- Decorating tips 2, and 3
- Bag ties or rubber bands
- Wax paper
- Small offset spatula
- Blush Gold luster dust
- Pink Gelato luster dust
- Vodka, grain alcohol, or any flavor extract
- Decorator brushes (Wilton and Sweet Sticks)
Read my Ultimate Guide To Royal Icing to learn all about royal icing consistencies.
Colors (I used Chefmaster)
- Coal Black
- Rose Pink


Instructions
- Cut the cookies from a chilled sheet of cookie dough. To make a number with a bow, cut the number first and place it on the baking sheet. Then cut the bow, placing it on the number cutout where you want it to fit on the number cookie. Put the bow and number together and gently squeeze the raw cookies together at the seam before baking. Bake the cookies at 350˚F for 10-12 minutes. Allow the cookies to cool completely before baking.
- Fit a decorating bag with a coupler and a decorating tip 2. Fill the bag with black flood consistency icing. Fit another decorating bag with a coupler and a decorating tip 1. Fill the bag with white flood consistency icing. Fit another decorating bag with a coupler and a decorating tip 3. Fill the bag with pink flood consistency icing. Secure the top of the bags with a bag tie or rubber band to keep the icing from spilling out as you decorate.
- Outline the bottom of the bow on the number cookie with an edible ink marker. Flood the bow with the black icing. Use the scribe tool to help shape the icing.
- Pipe white dots on the bow while the black icing is still wet. Allow the icing to dry for 20-30 minutes before piping the bow center. Set the cookie aside to dry overnight and move on to the other cookies.
- Place a piece of wax paper (approximately 8”x11”) on the back of a baking sheet or other flat surface.
- Fill the entire sheet of wax paper with pink royal icing dots. Allow the icing to dry for several hours or overnight. Loosen the dots from the wax paper with a small offset spatula.
- Switch the tip on the pink icing to a number 2. Flood the number cookie with the pink icing and use the scribe tool to help shape the icing.
- Cover the pink icing with the royal icing dots while the base layer is still wet. Allow the icing to dry for at least a couple of hours or overnight.
- Mix Blush Gold luster dust with Pink Gelator luster dust and a few drops of vodka.
- Apply the luster paint to the royal icing sequins.
To see the tutorial for the entire set of cookies, come on over to my Cookie Art Club. You’ll get access to all of my ad-free tutorials, my recipes, behind the scenes, sneak peeks, and personalized cookie decorating advice.


