3 Ways to Decorate Cookies with Wet-On-Wet Royal Icing

The wet-on-wet royal icing technique is one of my favorite methods for creating beautiful flowers on cookies. See my helpful tips for working with wet-on-wet royal icing and watch the video below!
Get access to exclusive cookie decorating tutorials, my cookie and royal icing recipes, and individualized cookie decorating advice by joining my Cookie Art Club!
This post contains affiliate links. Read my affiliate disclosure here.

Using the wet-on-wet royal icing technique allows you to create designs on your cookies in one smooth layer. It can be tricky because if you don’t finish decorate fast enough, the icing will start to crust over and you’ll be left with bumpy cookies.
Here are a few tips to get the most time possible out of your royal icing to get smooth wet-on-wet designs.
- Use more meringue powder in your royal icing – My royal icing recipe has about double what most royal icing recipes call for. This allows me to work with the icing longer before it starts to crust over. Depending on the weather, you should be able to work with the icing for 5 to 10 minutes.
- Make sure your icing is the right consistency – Getting the right consistency is one of the most difficult things about decorating cookies with royal icing. I use 15-20 second count icing. To test the consistency, take a scoop of icing out of the bowl and drop it back in. It should take 15 to 20 seconds to be completely smooth. This is what’s known as Flood Consistency Royal Icing.
Read my Ultimate Guide To Royal Icing to learn all about royal icing consistencies.


- Use your tools to help you – Even if your icing recipe and icing consistency are perfect, you might still have issues with the icing crusting too quickly. When this happens, you can use your scribe tool or a toothpick to pat down those annoying little peaks.
You can also use your scribe tool to help get rid of excess icing. If you find it running over the edges, let it crust over for about 15 minutes, then use your scribe tool to remove the runaway icing. Any jagged edges can be covered up with a border! 🙂
Here’s what you’ll need to make these wet-on-wet royal icing cookies
Supplies
- Chilled sheet of cookie dough
- Square plaque cookie cutter
- Rectangle plaque cookie cutter
- Baking sheets and perforated baking mats
- Flood consistency royal icing in black, light pink, light green, light yellow, dark pink, dark green, dark yellow, and white
- Stiff consistency royal icing in white
- 12” decorating bags with couplers
- Decorating tips 2 and 3
- Tipless decorating bags
- FooDoodler edible ink marker
- Scribe tool
- Damp paper towel
Colors (I used Chefmaster)
- Coal Black
- Rose Pink
- Leaf Green
- Lemon Yellow + a touch of Rose Pink

Instructions
- Cut the cookies from a chilled sheet of cookie dough. Bake the cookies at 350˚F for 10-12 minutes. Allow the cookies to cool completely before baking.
- Fit 4 12” decorating bags with a coupler and a decorating tip 2. Fill the bags with black, light pink, light green, and light yellow icing.
- Fill 3 tipless decorating bags with dark green, dark pink, and dark yellow flood consistency icing. Secure the top of the bags with a bag tie or rubber band to keep the icing from spilling out as you decorate. Cut very small openings in the tips of the tipless decorating bags.
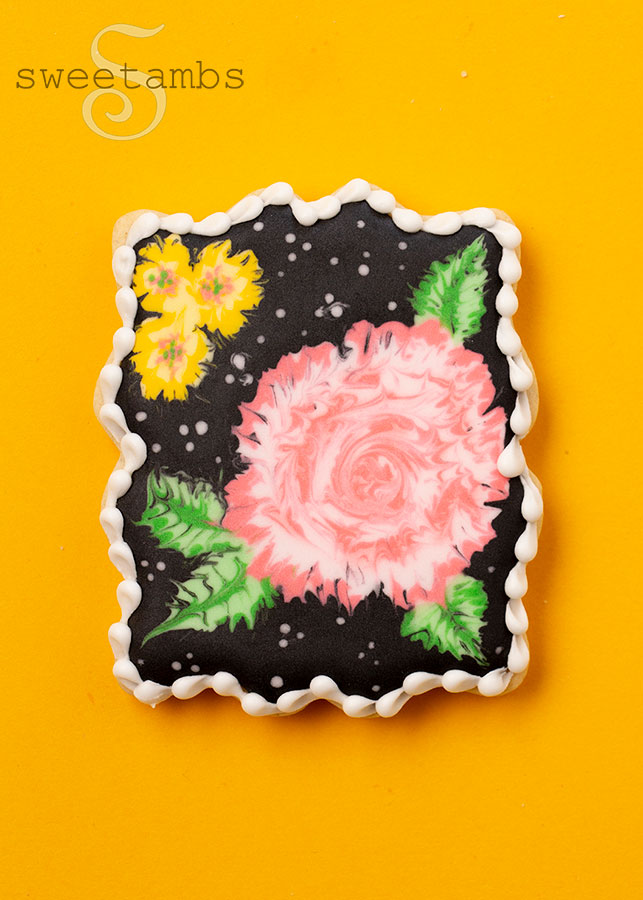

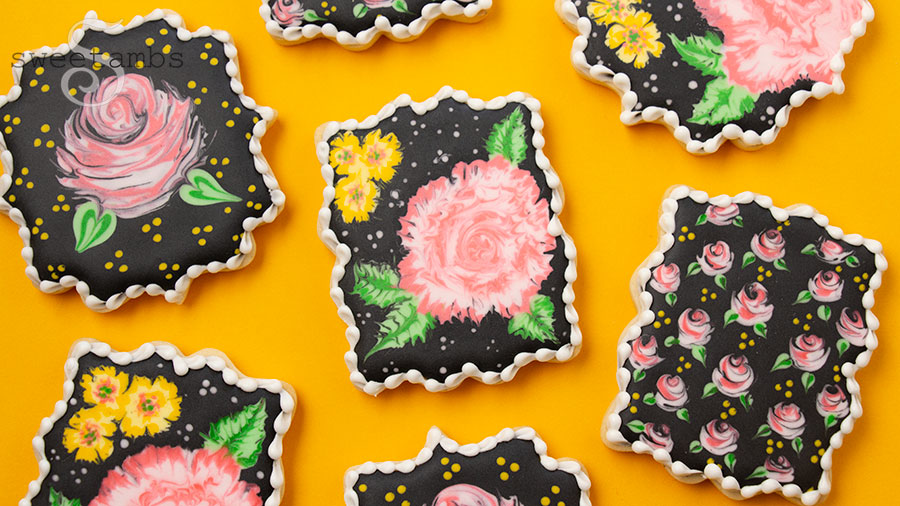
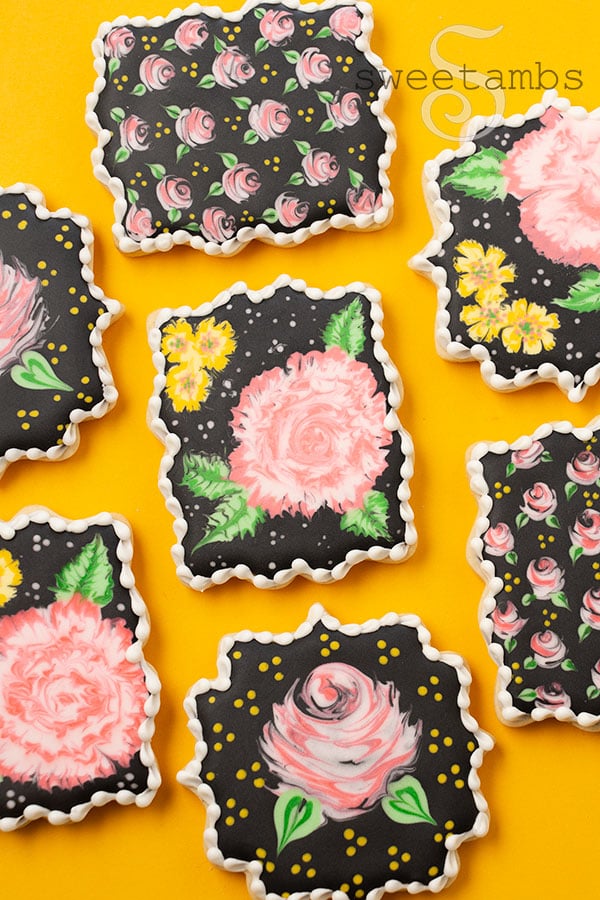
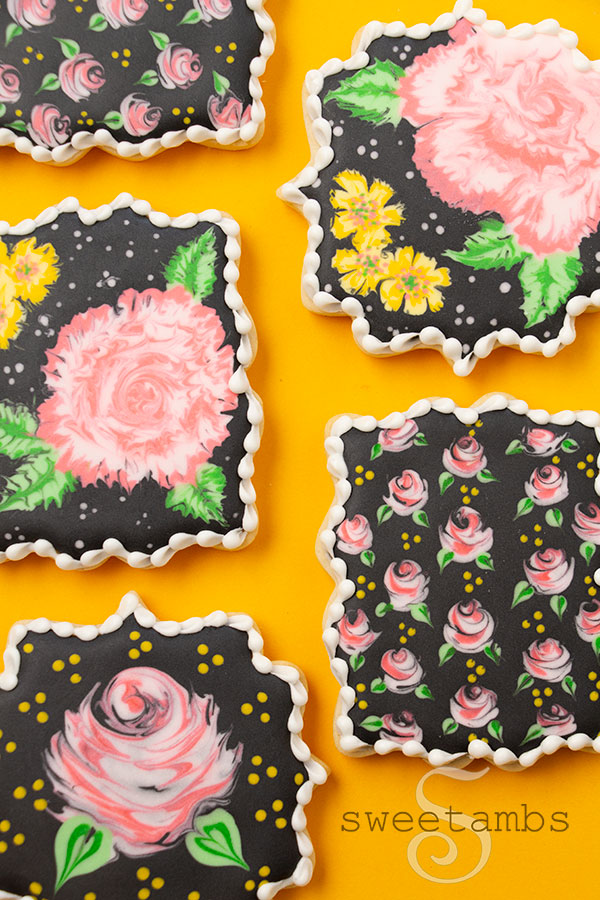
Floral Design 1 – Pink and Yellow Flowers
- Draw a rough outline of the flowers and leaves on a cookie with the edible ink marker.
- Fill in the space around the flowers with black flood consistency icing. Fill in the larger flower with light pink flood consistency icing, fill in the leaves with light green flood consistency icing, and fill in the smaller flowers with light yellow flood consistency icing.
- While the base layer is still wet, pipe details with the darker shades of pink, green, and yellow flood consistency icing.
- Use the scribe tool to blend the colors and shape the icing. Keep a damp paper towel nearby to keep the scribe tool clean between passes through the icing.
- Pipe dark pink and dark green dots in the center of the yellow flowers.
- Dip the scribe tool into white flood consistency icing and touch it to the black icing to create very small dots. Allow the icing to dry overnight.
- Fit a 12” decorating bag with a coupler and a decorating tip 3. Fill the bag with white stiff consistency icing.
- Pipe a bead border around the edge of the cookie with the stiff icing.
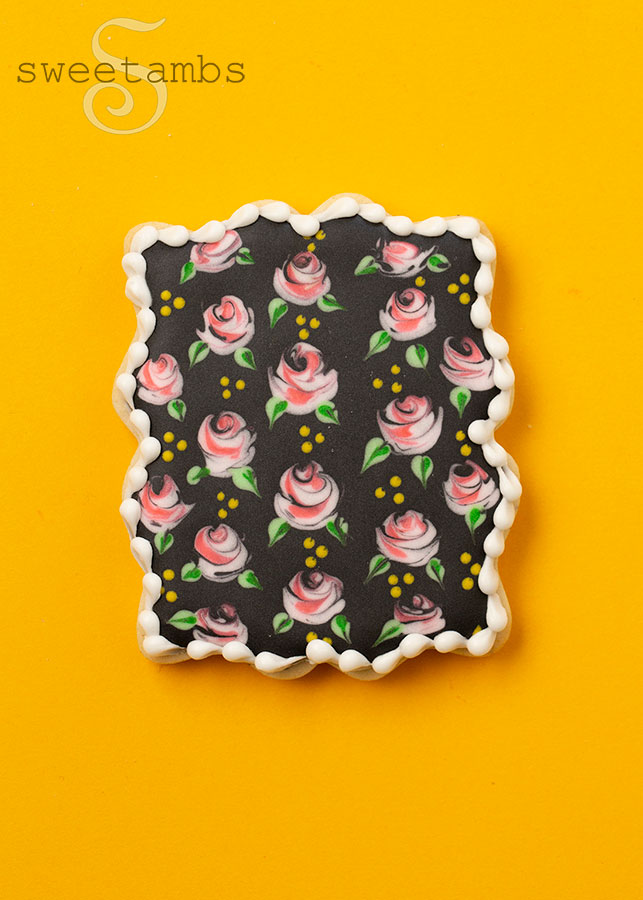

Floral Design 2 – Small Roses
- Flood a cookie with black flood consistency icing and a decorating tip 3.
- Immediately pipe light pink dots with flood consistency icing and a decorating tip 2, then pipe a swirl of dark pink icing in each dot.
- Use the scribe tool to swirl the colors and shape the icing into roses.
- To make leaves, pipe one or two dots of light green icing on each side of the roses. Pipe a smaller dot of dark green icing on top. Drag the scribe tool through the icing to shape the dots into leaves. Allow the icing to dry overnight.
- Pipe a bead border around the edge of the cookie with white stiff icing and a decorating tip 3.
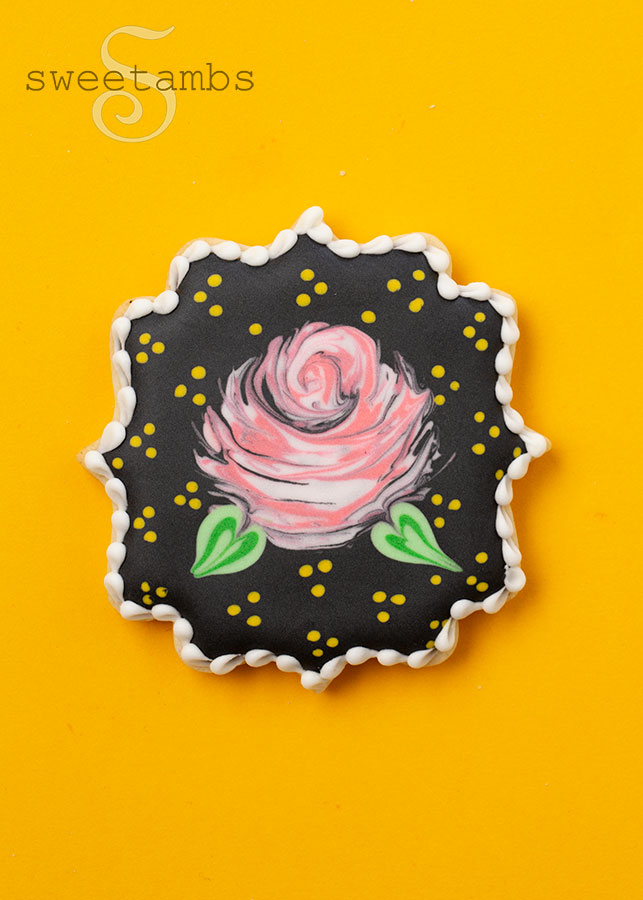

Floral Design 3 – Large Rose
- Flood a cookie with black flood consistency icing and a decorating tip 3.
- Immediately pipe one large dot in the center with flood consistency icing and a decorating tip 2, then pipe a swirl of dark pink icing inside the dot.
- Use the scribe tool to swirl the colors and shape the icing into a rose.
- To make leaves, pipe two dots of light green icing on each side of the rose. Pipe a smaller dot of dark green icing on top and an even smaller dot of light green icing again. Drag the scribe tool through the icing to shape the dots into leaves. Allow the icing to dry overnight.
- Pipe a bead border around the edge of the cookie with white stiff icing and a decorating tip 3.
