Brush Embroidered Eyelet Lace
This brush embroidered eyelet lace tutorial is the second part of the wet-on-wet striped cookie tutorial, which you can see here.
 For this second part of the tutorial you will need:

 Pipe a little bit of stiff consistency royal icing inside the pattern and use a damp square tip brush to dab the icing to texturize it, similar to how I made these teddy bear cookies. Avoid the circle in the center because this empty space is what will give the icing the look of eyelet lace.
 Don’t try to do the entire row all at once. Work on a small section at a time so that the icing doesn’t dry before you have time to dab it.
 Once you’ve filled in the row, pipe an outline using a zig zag motion to create a ruffled edge.
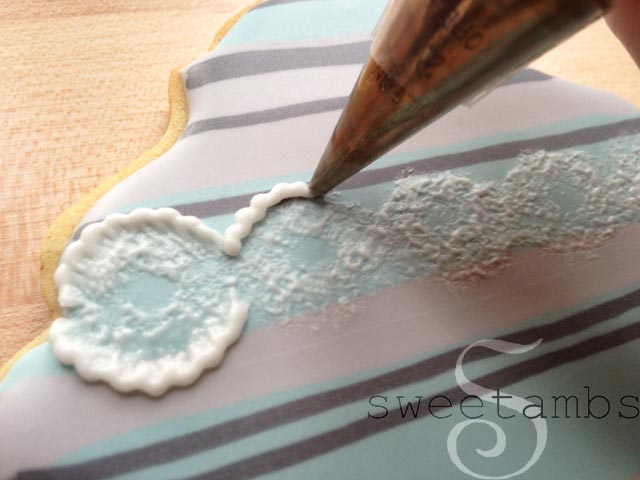
 Then use the square tip brush to bring the icing inward. Again, just work with one or two sections at a time. You can see this brush embroidery method in action in this video on how to make brush embroidered flowers, which is available in my tutorial shop.
 Once all of the edges are brushed, outline each of the little circles to complete the eyelet lace look.
 For the next section, I piped swags with tear drop shapes instead of circles.
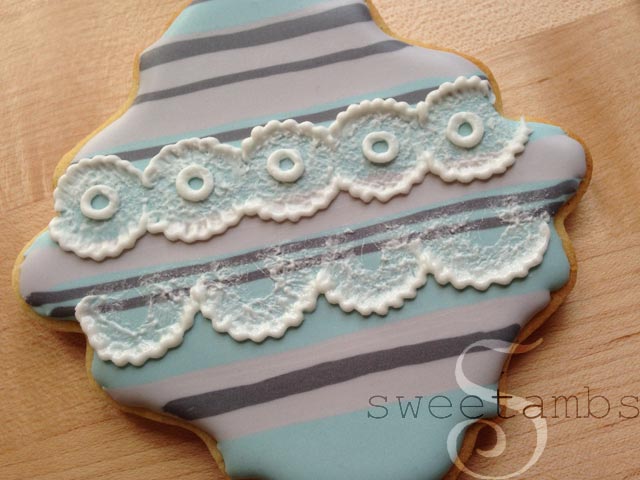
 Then I added a bead border on the top edge of the swags. You can make all kinds of neat patterns with this method.
 Finish the cookies with a bead border around the edge. Visit the shop for a video with full instructions on piping a bead border.
 Allow the icing to dry for about 2-4 hours before handling the cookies.
 Click on the images below for more cookie decorating tutorials


For this second part of the tutorial you will need:- Striped cookies that have been allowed to dry at least 8 hours
- scribe tool

- Stiff consistency royal icing
- Round decorating tip 2
- Square tip brush (the one shown here is from the Wilton 3 pack)

Pipe a little bit of stiff consistency royal icing inside the pattern and use a damp square tip brush to dab the icing to texturize it, similar to how I made these teddy bear cookies. Avoid the circle in the center because this empty space is what will give the icing the look of eyelet lace. Don’t try to do the entire row all at once. Work on a small section at a time so that the icing doesn’t dry before you have time to dab it. Once you’ve filled in the row, pipe an outline using a zig zag motion to create a ruffled edge. Then use the square tip brush to bring the icing inward. Again, just work with one or two sections at a time. You can see this brush embroidery method in action in this video on how to make brush embroidered flowers, which is available in my tutorial shop. Once all of the edges are brushed, outline each of the little circles to complete the eyelet lace look. For the next section, I piped swags with tear drop shapes instead of circles. Then I added a bead border on the top edge of the swags. You can make all kinds of neat patterns with this method. Finish the cookies with a bead border around the edge. Visit the shop for a video with full instructions on piping a bead border. Allow the icing to dry for about 2-4 hours before handling the cookies. Click on the images below for more cookie decorating tutorials 
Subscribe
Login
0 Comments
Subscribe
0 Comments